


If you have lived in Texas for more than five seconds in the scorching summer months, you know being outside in the afternoon and evening feels like standing directly next to the sun. While summertime often draws us outdoors, we also seek the solace of an air-conditioned indoor activity from time to time. Whether you are a busy mom, a single businesswoman in need of a girls’ night out with friends or even a couple looking for a date night or a double date night, Frisco offers an amazing selection of unique, new experiences to try.
In the ever-growing age of do it yourself (DIY) activities and projects, Melissa Winton and Melissa Lagrange decided to plant their business roots right here in Frisco. They have taken their love for crafts, home decor and Pinterest obsessions to a new level through the opening of their DIY project studio, Crafted, located downtown at 8700 Main Street, Suite 150.
The crafty duo, known as “M&M” to many, started out building elaborate sets and scenes for Halloween attractions and eventually began partnering up for other build projects. “Before we knew what hit us, we had become partners in DIY crime, filling our weekends with lots of laughs, power tools and Pinterest projects,” the duo explains. Their idea was born as they began hosting their own “make and take” classes where others could build art projects while hanging out and enjoying a drink.
As self-professed Pinterest fanatics and craft lovers, my best friend Katie and I needed an adventurous night out. As soon as we heard about this fun little spot, we knew we wanted to get our craft on. Signing up for the class was super easy, as we simply went to the Crafted website (getcraftedusa.com) and followed the process from there. After viewing the site’s calendar, you sign up by selecting the night and class you want to take part in. Each class features a specific type of project with dozens of customization options. Then, you select your project type and stencil (this is where you will provide any special requests or customization instructions to ensure your stencil is right) and, finally, you purchase your class registration through the PayPal® link. As a reminder, M&M ask that those attending arrive at least 10 minutes early for their selected class.
 Katie and I chose a date for the “Crafter’s Choice Standard Sign,” which allowed us to choose project sizes, wording and customization. Guests can also choose to attend on nights when they can make reversible signs, crafter’s choice small signs, Texas-sized signs or trays.
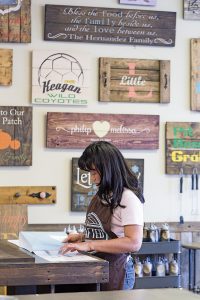
As we entered the facility, Ms. Winton gave us a warm welcome (Ms. Lagrange was off that night, as it was a small class). Ms. Winton confirmed the signs we had chosen and encouraged us to pick from one of the six huge workstation tables we would call home as we crafted. There were two other people attending that evening, a mother and daughter, out for a fun girls’ night like we were. The studio is a cozy, bright, open space, and the walls are lined with tons of projects for patrons to see and reference during the making of their projects. The back wall of the studio has a beautiful pallet wall with a unique metal rendering of the company logo.
We got to our workstations, which are large, sturdy tables with metal tabletops, perfect for making a mess and not having to worry about ruining anything. The middle of the work stations are lined with supplies used throughout the process like hammers, screws, earplugs, paint brushes, tools used to distress the wood chosen for your project and gloves to keep your hands clean. We got our aprons on and were ready to craft! Ms. Winton excitedly welcomed us again after we were all set and gave us a quick visual tour of the space. She gave us an overview of how the evening would go, an explanation of the materials available to us and covered a few cautionary details to ensure we stayed safe throughout the process.
Ms. Winton guided us over to the front corner of the studio where wood for projects is stored and allowed us to pick out which pieces we wanted to use for our projects. Crafted gets the wood for their projects directly from a lumber mill, so it is not pre-sanded. Each piece has imperfections that make the wood authentic and unique.
Back at our stations, it was time for the fun to begin! Ms. Winton explained that our next step was to distress the wood and give it as much character as we wanted by using the tools in the center of our table. There were regular hammers, textured hammers and meat tenderizers. We geared up with the provided earplugs, Ms. Winton set a timer and away we went for three minutes of banging, distressing and adding character to our wood. The perfect part about this process is it is totally up to you in terms of how you “artistify” your sign. Some people will like old, distressed barn wood, while some prefer a cleaner, more untouched finish.
Next, it was time to stain the wood. There was a wall that displayed all the stain colors and even a few finishes (whitewash, etc.) to choose from. Our instructor showed us examples of each stain seen on projects around the room. Katie and I both chose the “burnt edge” stain, which ultimately makes the wood look like it has been charred a bit. It gives the wood a weathered, sophisticated and interesting look. Ms. Winton poured the stain colors in small ramekin-sized cups and we painted then wiped off excess. As we stained, Ms. Winton moved about the room answering questions. Her help and pointers were appreciated!
After staining, it was time to bring out the power tools! Ms. Winton did a wonderful job explaining the how-tos of this process. Katie and I helped each other as one drilled and the other held the project down and steady. Just like that, before our eyes, in matter of minutes, our projects were together and ready to paint! And, yes, using the power drill was way fun.
Crafted has 25 paint colors in-house, all of which are interior latex paint (you can mix colors, if you so desire). Katie and I had both chosen to make a vertical sign that said “welcome,” and we customized our parents’ last names on the signs, as we planned to give them as gifts for upcoming anniversaries. I am traditional and love clean, white words against a darker wood, so I chose antique white while Katie, ever the creative one, chose a beautiful seafoam blue for the lettering and an awesome pop of coral for the name. Melissa gave us a quick how-to on transferring our stencil to the wood (this can be tricky, so be sure and listen) and then explained the painting technique that allows for the best coverage and optimum seal with the stencil (so it does not bleed under). We completed two layers of paint using the technique she demonstrated.
 We loved just hanging out and chatting with one another as the night went on! By the end of the class, we felt like we knew Ms. Winton and the mother/daughter duo who were in the class with us! After 10-15 minutes or so of drying, we peeled the stencils off and beautifully-crafted (pun intended) art was right before us. We were so proud!
Crafted is doing it right, friends. If you want a truly unique and hands-on night out with friends or family, put this next on your list. Crafted welcomes private parties, corporate groups and extracurricular groups for a fun-filled evening of together time. Make a project for your home, a loved one or as a gift to commemorate a special occasion. Crafted is a BYOB studio. The regularly scheduled classes are from 7 p.m. to 10 p.m., so plan on being there the entire time, as that is usually how long the process (start to finish) takes. You are sure to have so much fun sipping on wine, laughing with friends, getting to know others and perfecting your craft.